
What Is a Motorcycle Fairing Mount Tab?
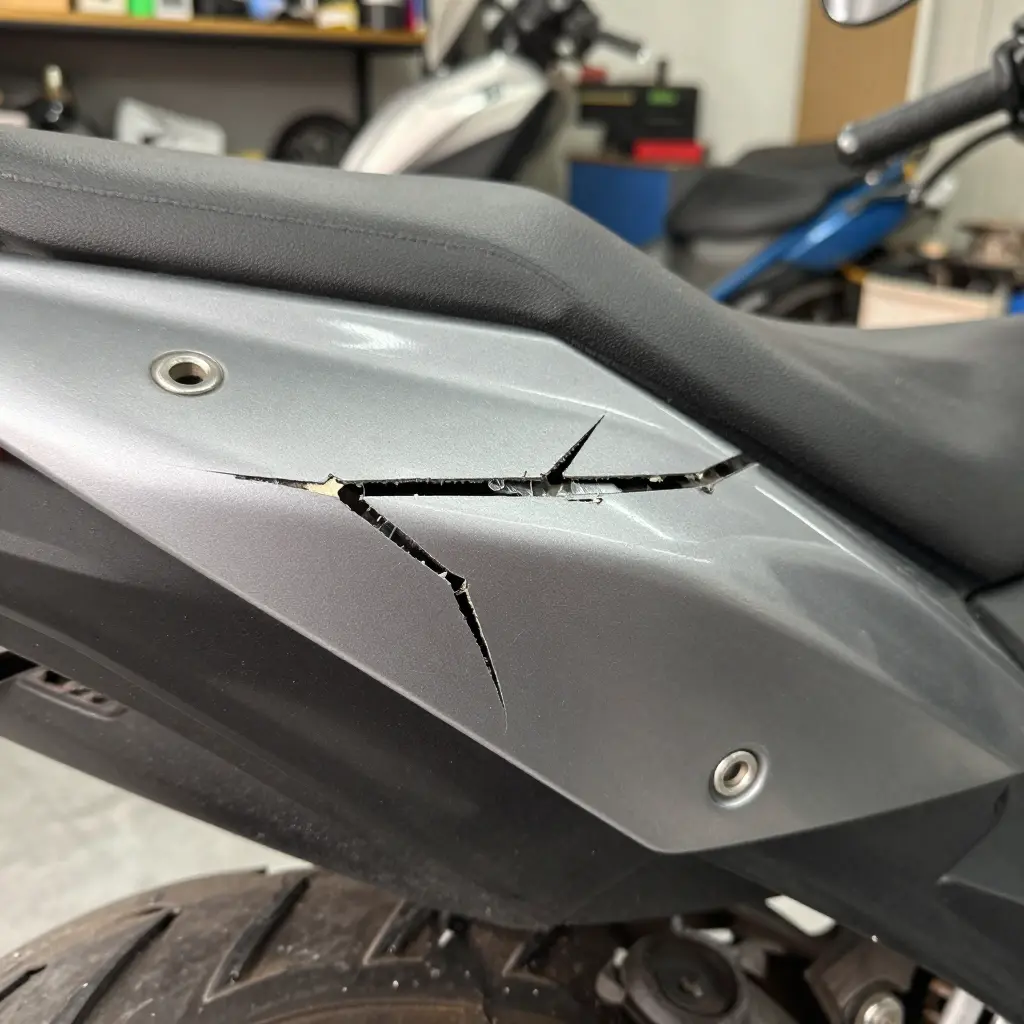
A fairing mount tab is a small bracket, either molded into a plastic panel or welded to the frame, with a hole for the bolt, screw, or clip that holds the bodywork in place. Motorcycle fairing mount tab cracks are among the most common structural problems riders run into, and they usually force a repair or replace decision.
Tabs live with constant vibration, heat cycles, wind load, and road impacts. The plastic fatigues, a hairline crack opens, and every ride works it wider. Once a tab lets go, the fairing can sag or rattle, or drop off altogether and expose the wiring and radiator behind it.
Below: what causes these cracks, how to find them before they spread, and how to weigh repair against replacement.
What Actually Causes Fairing Mount Tab Cracks?
A tab rarely fails because of one event. More often several small stresses stack up over months until the plastic gives. Knowing the sequence lets you spot a tab that is already failing and change how you bolt panels on, so the fairing stays tight and quiet.
The usual causes of fairing bracket stress:
- Vibration fatigue – Engine and road buzz flex the tab thousands of times per mile until a hairline crack opens.
- Over-torqued fasteners – A bolt cranked past spec crushes the plastic and leaves a stress riser that splits the first time the panel moves.
- Crash impact – A tip-over or low-slide sends force straight into the mounts and can split a tab even when the visible fairing looks untouched.
- Thermal expansion and contraction – Daily heat cycles make plastic swell and shrink a little; rigid bolts leave nowhere for that movement to go, so the tab absorbs it.
- Poor aftermarket fitment – Cheap replacement panels often have misaligned holes, so you flex the tab to seat it, and it fails early.
- Aging plastic or composite materials – UV light, heat, and time make plastic brittle, and then ordinary vibration is enough to crack it.
Most of these either add stress or take away the flexibility the tab needs. Over-torqued bolts and crash damage are sudden and visible; fairing bracket stress from vibration and thermal cycling builds slowly and is easy to miss; age quietly compounds both.
So a fairing mount tab repair should start with the trigger, not the crack. Rebuild the tab, then remove the original stress (correct torque, fresh vibration-damping washers, a panel that actually fits), or the same crack comes back within a few thousand miles.
Match the fix to the failure you see. A tab cracked by fatigue needs a different repair than one crushed by a wrench, and getting that right is the difference between a lasting repair and a recurring problem.
Common Causes of Fairing Mount Tab Cracks and Their Warning Signs
If you know why a tab cracks, you can often catch the damage before a panel comes loose. The table matches each cause to the places it usually shows up, the first sign to watch for, and how serious it tends to be. Keep it handy in the shop or the garage.
| Cause | Typical Location | Early Warning Sign | Severity |
|---|---|---|---|
| Vibration fatigue | Upper and side tabs near headlight and mirrors | Hairline cracks and stress whitening in the plastic | Moderate to High |
| Over-torqued fasteners | Fastener holes on nose and side panels | Crushed or cracked tab edges, stripped threads | Moderate |
| Crash impact | Outer edge tabs on the dropped side | Sudden fracture, missing chunks, spidered cracks | High |
| Thermal stress | Tabs close to engine, exhaust, or heat shielding | Warping, brittleness, discolored plastic | Moderate to High |
| Poor fitment | Misaligned mounting points after a rebuild | Gaps or stress marks when panels are forced on | Low to Moderate |
How to Read the Severity Column
- Low to Moderate: Usually caught early during routine inspection, and often repairable with reinforcement.
- Moderate: Moves quickly once vibration or heat is involved; schedule the repair soon.
- High: Structural failure risk; the panel can detach and become a road hazard.
Use the table alongside a hands-on inspection, and check the opposite side of the bike too. The same stress usually affects the mirror-image tabs.
Diagnosis and Inspection: Finding Fairing Mount Tab Cracks
Before you order a panel, work out what you are actually dealing with. A cracked tab rarely snaps loudly. Usually it hides behind the bodywork and shows up as a vibration you cannot place, or a gap that keeps reopening no matter how often you tighten the bolt. A careful fairing mount tab inspection tells you whether this is a five-minute fix or a new panel.
What to Look For
Start with your eyes and hands, not your tools. These are the signs of a compromised mount:
- Hairline fractures – thin, spider-like lines radiating from the mounting hole, often invisible until you flex the panel slightly.
- White stress marks – cloudy or chalky streaks where the tab has been bending under load.
- Loose fairing panels – edges that lift, wobble, or sit proud of the frame even with every fastener tight.
- Rattling sounds – a tinny buzz at certain RPMs or over rough pavement, from a tab that is cracked but not yet broken.
Step-by-Step Inspection
- Remove the fairing. Work slowly and photograph each fastener location as you go, so you do not crack a healthy tab while pulling a panel that is still bolted.
- Clean the area. Degrease the tabs and the frame contact points. Dirt hides hairline cracks well.
- Check tab-to-frame contact points. Look for gaps, rubbing marks, or a bolt hole that has elongated into an oval. Flex each tab by hand and watch the base for movement.
- Compare sides. If one tab looks off, inspect its mirror on the other panel. Fairings tend to fail symmetrically, and an asymmetrical crack points to an alignment problem or previous crash damage.
The diagram shows where a cracked tab typically hides and which contact points deserve the closest look.
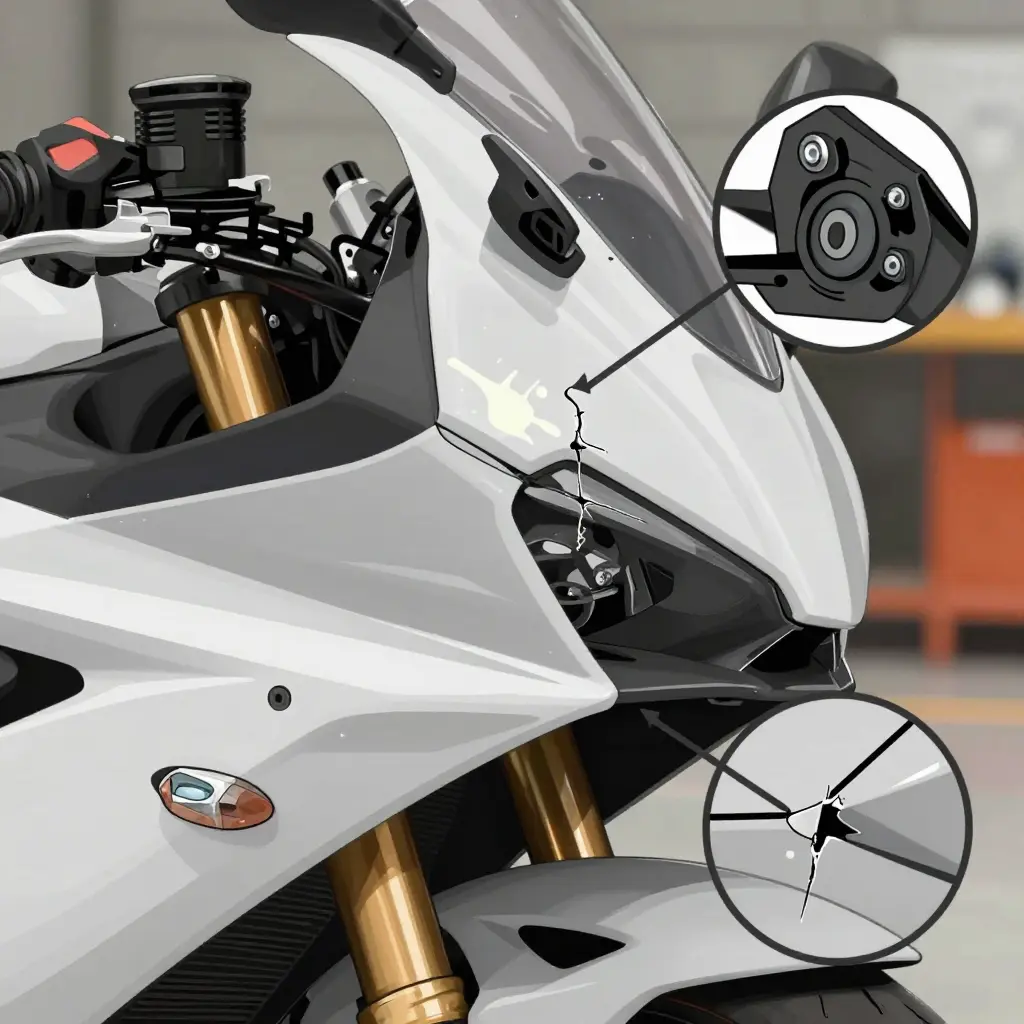
Once you know the extent of the damage, the next decision is straightforward: repair the tab or replace the panel.
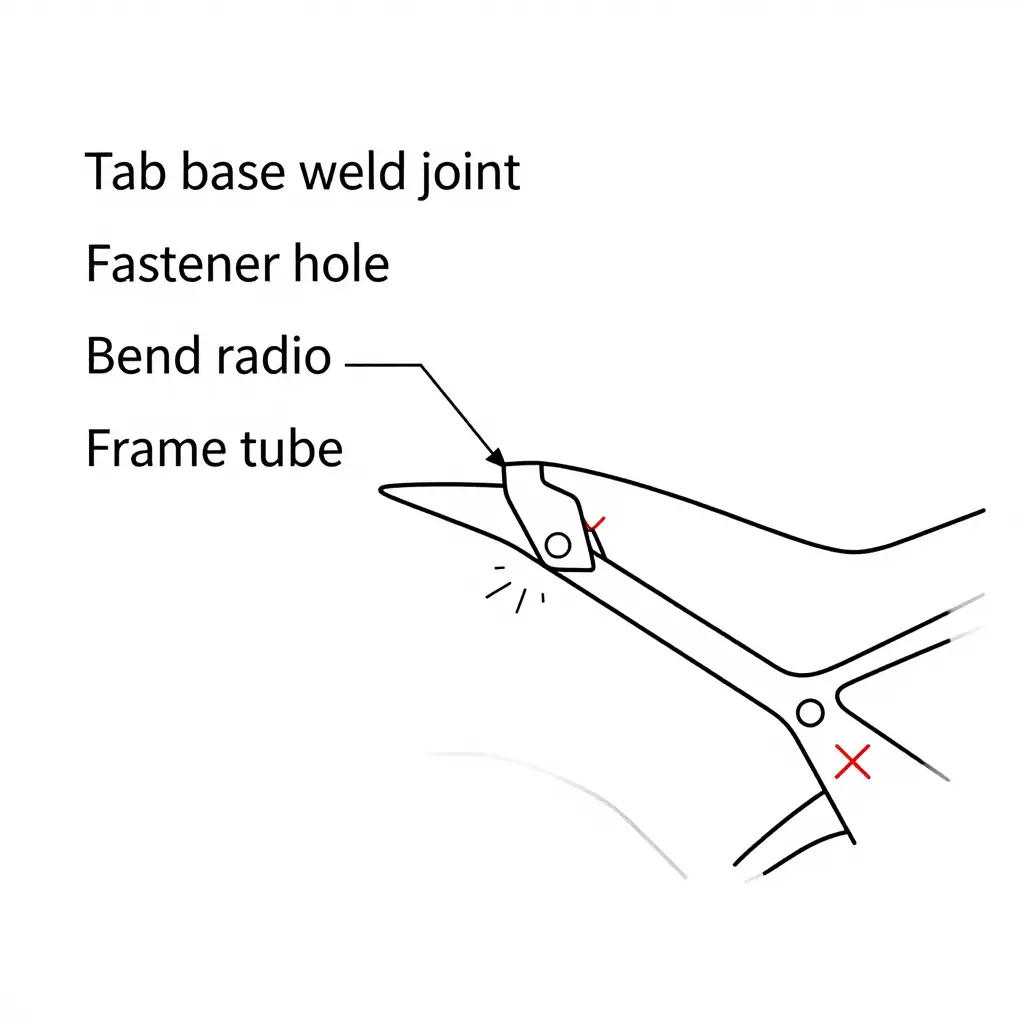
Above: a simplified anatomy of a fairing mount tab. Note the two stress risers where most cracks begin – the weld joint at the tab base and the edge of the fastener opening.
Repair Methods for Cracked Fairing Mount Tabs
Many mount tab cracks can be brought back to a genuinely usable standard, so it is worth pricing a repair before you buy new plastics. The method has to match the material and the load the tab carries. Any successful fairing tab repair starts with a clean, degreased surface and an honest read on whether the crack came from stress or a single impact. The methods below run from the most common workshop approach to the strongest structural options.
- Plastic welding – A heat gun or dedicated welder melts matching filler rod into the crack so the parent material fuses back into one piece. Works well on ABS and most thermoformed fairings.
- Reinforcement with backing plates – Bonding or welding a thin plate behind the tab spreads the load over a wider area. Good for tabs that keep cracking at the same point.
- Epoxy bonding – A structural epoxy to clamp and rejoin the break is quick and clean. Best on small, low-load cracks, or as a complement to mechanical reinforcement.
- Fiberglass or ABS patching – Resin-soaked glass mat, or ABS shavings dissolved into a paste, rebuilds missing material. The usual choice when a chunk of the tab has broken away.
- Metal brackets or gussets – Riveting or bolting a small aluminum bracket across the joint is the most rigid repair. Reserve it for high-vibration mounts where plastic alone keeps failing.
In practice a plastic welding fairing repair is often paired with a backing plate: the weld restores the shape, the plate restores the strength. That combination is what makes the fix durable rather than cosmetic.
Material compatibility matters more than technique. ABS and most OEM fairings weld and dissolve cleanly with acetone or MEK-based fillers, so they take plastic welding and ABS patching well. Fiberglass responds to epoxy and glass matting but cannot be welded in the thermoplastic sense. Polypropylene, common on cheaper aftermarket panels, is hard to bond with adhesives and usually needs mechanical fastening or a specialty rod.
A repair is structurally sound when the tab can carry its original share of road and vibration load without flexing at the joint. If the crack sits on a primary mount that holds the fairing against wind pressure, reinforcement or a metal gusset is the safer choice. If the crack is minor and the surrounding panel is intact, welding or epoxy alone will usually hold for years.
For repairs you cannot safely finish on the roadside, a professional shop or recovery service can get the bike home so the fairing never becomes a highway safety problem.
Which Causes Crack Fairing Mount Tabs Most Often?
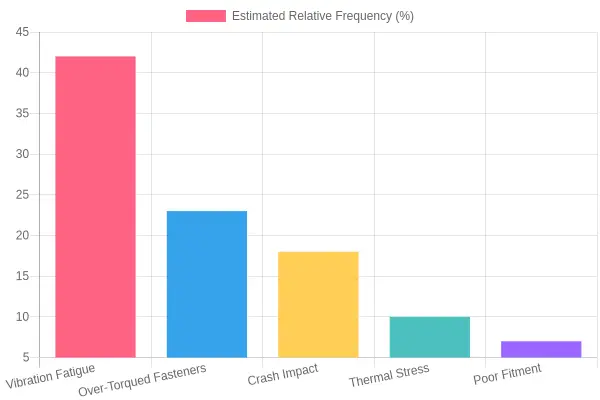
Cracked tabs rarely have a single tidy origin, but some causes turn up far more often than others. The chart below gives rough estimates of the relative frequency of each root cause, a quick reference for which culprit you are most likely looking at.
Reading the Chart
- Vibration fatigue (42%) leads by a wide margin. Fairing tabs are thin, cantilevered, and carry the weight of the panels while pulsing down rough roads. Repeated flexing works the material until a crack runs from the base of the tab.
- Over-torqued fasteners (23%) come next. A bolt tightened past spec crushes the plastic around the mounting hole and creates stress risers that split under load. The damage is often invisible until the tab lets go.
- Crash impact (18%) covers tip-overs, low-slides, and dropped bikes. These are acute, high-energy events that crack tabs immediately rather than over time.
- Thermal stress (10%) builds through expansion and contraction cycles, especially on faired sportbikes where engine and exhaust heat bathe the panels.
- Poor fitment (7%) rounds out the list. Aftermarket bodywork or a bent subframe forces tabs to sit under constant preload until they pull apart.
What the Distribution Tells You
The two “slow killers”, vibration and torque, account for roughly two-thirds of cases. That is good news for owners, because both are largely preventable with correct hardware and careful assembly. If the bike has been down or clearly struck something, the cause is usually obvious and you can go straight to assessing structural damage.
| Rank | Cause | Estimated Frequency | Typical Onset |
|---|---|---|---|
| 1 | Vibration fatigue | 42% | Gradual |
| 2 | Over-torqued fasteners | 23% | Gradual |
| 3 | Crash impact | 18% | Sudden |
| 4 | Thermal stress | 10% | Gradual |
| 5 | Poor fitment | 7% | Gradual |
Converting Data Into a Diagnosis
Treat the chart as a starting point, not a verdict. If a tab cracked gradually and the fasteners look deformed, over-torquing moves to the top of the list. If nearby tabs show matching fatigue lines and the bike commutes over rough pavement, vibration is the likely story. If only one tab failed after contact, impact takes priority whatever the percentages say.
Repair vs. Replace: A Decision Framework
Not every cracked tab ends the same way. Some are a weekend fix; others mean it is time for a new panel. The right call comes from weighing several factors together rather than looking at the damage in isolation.
Start with the damage itself
A lone hairline crack near a bolt hole usually tolerates repair. Multiple cracks, cracks that radiate across the tab base, or damage near a high-stress corner push toward replacement. Location matters as much as count: a tab that only aligns plastic is forgiving, while one that carries load is not.
Understand the tab’s structural role
Tabs are either cosmetic locators or load-bearing anchors. A non-structural tab can be bonded or plastic-welded with confidence. A structural tab that holds the fairing at speed, channels vibration, or supports a mirror or luggage pod needs factory-grade strength that a field repair rarely delivers.
Match the fix to the material
ABS responds well to plastic welding and solvent bonding. Polypropylene and fiberglass need different techniques, and carbon fiber repairs are best left to a specialist. When the material resists a clean repair, replacement becomes the cheaper long-term option.
Do the money math
Compare the cost of a professional repair, a replacement panel, and your own time. When a repair approaches half the price of a new panel and the tab is structural, new wins.
The table below summarizes how these factors combine into a recommendation.
| Factor | Lean Repair | Lean Replace |
|---|---|---|
| Crack count | Single, stable | Multiple or growing |
| Crack location | Cosmetic tab, bolt-hole edge | Load-bearing base |
| Structural role | Alignment only | Supports load/vibration |
| Material | ABS, weldable | Carbon fiber, brittle PP |
| Cost difference | Repair well under half of new | Repair near or above half of new |
| Parts availability | OEM panel scarce/expensive | OEM or aftermarket in stock |
| Bike value and use | Older commuter, low stress | Newer, track or touring use |
Read the table as a weight of evidence. Two or three “replace” signals, especially a structural tab with multiple cracks, make replacement the sound choice. One isolated cosmetic crack on a weldable ABS tab, on a bike you ride gently, is a clear repair. If you are genuinely unsure how to repair or replace motorcycle fairing components, default to the option that preserves structural integrity at speed.
Repair vs Replace: Fairing Mount Tab Crack Decision Guide
Before committing to either path, weigh the trade-offs. This table lines up the two options across the factors that matter most, so you can match the choice to your bike, your budget, and how you ride.
| Factor | Repair Option | Replace Option | Recommended When |
|---|---|---|---|
| Cost | Low to moderate – plastic welding supplies plus labor, often $20-$80 DIY or $75-$150 at a shop | High – OEM or aftermarket panel, typically $150-$600+ depending on make and finish | The crack is isolated and the panel is otherwise sound |
| Durability | Moderate to good when reinforced with a backing plate and proper plastic welding | Excellent – factory-rated strength, fit, and flex | The tab carries real load or you ride aggressively |
| Labor and Time | 1-3 hours hands-on, plus overnight cure time | Minutes to bolt on, but days to order and color-match | You need the bike road-ready quickly |
| Cosmetic Outcome | Good with careful prep and paint; a faint seam may remain | Factory-perfect finish matched to OEM color | Show-quality looks matter or the crack is highly visible |
| Long-term Reliability | Solid if reinforced, though the same spot can crack again | Best long-term integrity with no recurring failure point | You plan to keep or resell the motorcycle |
Use it as a tiebreaker: if the panel is rare, expensive, or NLA (no longer available), repair usually wins. If it is cheap, still in production, and the bike sees hard use, replacement is the safer long-term bet.
Cost and Labor: Repair or Replace?
When a tab cracks, the first question is simple: fix it or replace it? The answer usually comes down to money, and knowing the real fairing mount tab repair cost helps you choose fast without overspending.
The DIY Route
A basic ABS cement repair is the cheapest option. A tube of solvent cement runs $10 to $20, and you can finish the job in an afternoon.
A plastic welder costs more up front. Starter units run $40 to $150, but they deliver a stronger bond than glue alone. Add a reinforcement kit (mesh or fiberglass) for $15 to $30, and a full DIY repair lands around $25 to $180 plus your time.
Professional Repair Labor
A shop that plastic-welds and reinforces the tab charges $75 to $200 in labor and usually needs one to two days. You are paying for skill and a warranty, not just materials.
Replacing the Panel or Set
A single OEM fairing panel costs $150 to $500. A complete OEM fairing set runs $1,000 to $2,500. Aftermarket sets can cost 10-40% less than other sites, which often makes replacement the smarter call. On summitfairings.com you will find over 3,000 styles covering almost all motorcycle models, with answers within six hours.
| Option | Typical Cost (USD) | Labor Time |
|---|---|---|
| DIY ABS adhesive | $10 – $20 | 1-2 hours + cure |
| DIY plastic welder | $40 – $150 | 2-4 hours |
| Reinforcement kit | $15 – $30 | 1-2 hours |
| Professional plastic weld | $75 – $200 | 1-2 days |
| Single OEM panel | $150 – $500 | Varies |
| Aftermarket set | $400 – $900 | 4-8 hours |
| Complete OEM set | $1,000 – $2,500 | 4-8 hours |
Cracked Mount Tab: Repair or Replace Decision Flow
The steps below map the path a cracked tab should take, from first inspection to the final call. Work through them in order so you do not spend money on the wrong outcome.
How to read the flow:
- Assess Damage – Determine crack length, depth, and whether the surrounding material has deformed.
- Check Structural Role – Identify whether the tab carries real load or is purely cosmetic trim support.
- Evaluate Cost – Weigh the price of a professional repair against the price of a replacement panel or mount.
- Choose Repair or Replace – Follow the branch that matches your structural and cost findings.
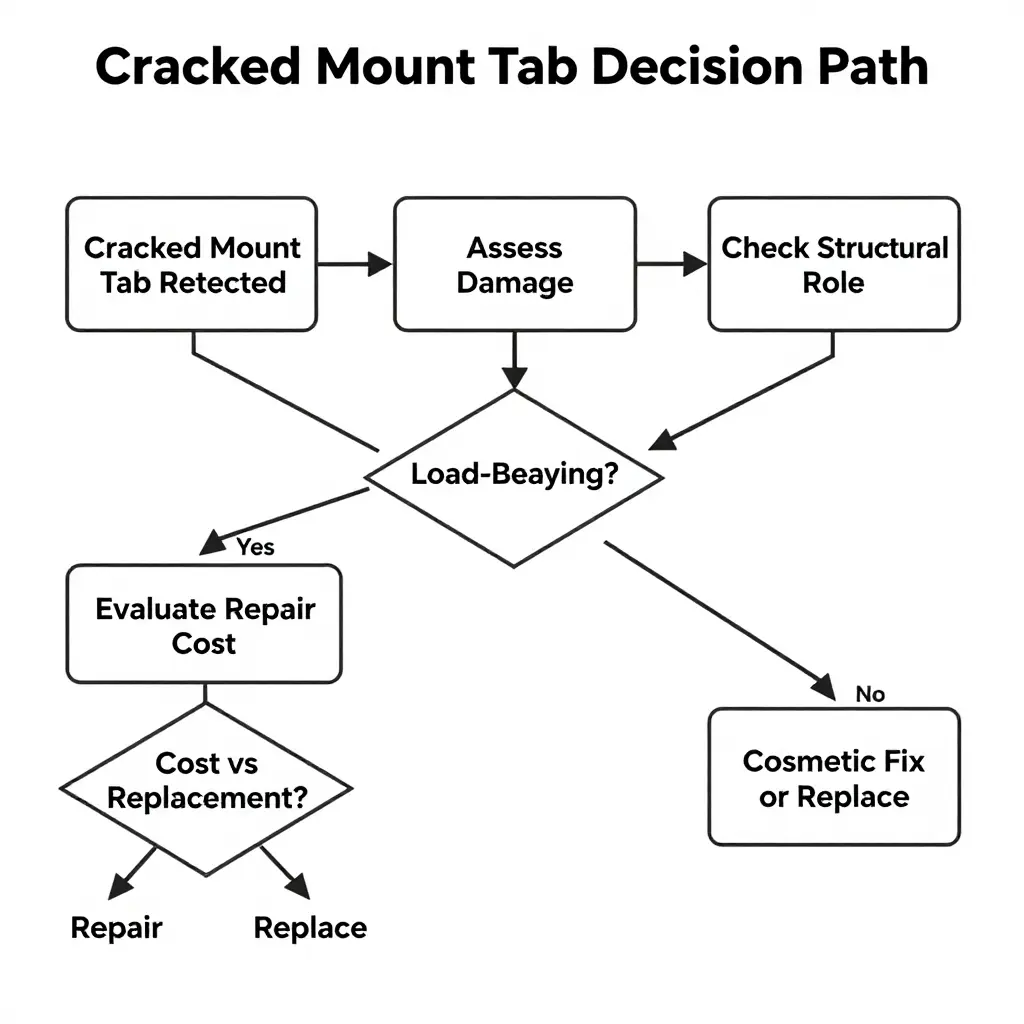
Keep this on the bench: if the tab sits in a high-stress, load-bearing spot and a repair cannot restore full strength, replacement is the safer call. If it is a low-stress cosmetic mount with a clean crack and a modest quote, a reinforced repair usually makes the most sense.
Preventing Fairing Mount Tab Cracks: A Practical Maintenance Guide
Preventive care goes a long way. These small tabs carry the full weight and vibration of the bodywork, so a minor oversight during installation can seed a crack that grows for months. The habits below are cheap and easy to fold into your regular fairing maintenance.
- Follow factory torque specs. Tighten fairing fasteners to the manufacturer’s torque value with a calibrated wrench instead of guessing by feel. Over-tightened bolts are a leading cause of tab stress fractures.
- Add rubber or vibration-damping washers. Rubber washers, grommets, or damping sleeves between the fairing and its mounting points absorb engine and road vibration before it reaches the tab.
- Test-fit aftermarket fairings carefully. Before final assembly, check that aftermarket panels align without forcing, and trim or shim any mounting hole that needs pressure to seat.
- Inspect tabs periodically. During routine cleaning or an oil change, look for hairline cracks, whitening plastic, or loose fasteners around every mount.
- Resist overtightening during reassembly. Snug fasteners gradually in a crisscross pattern and stop at the spec; “a little extra” is exactly what cracks tabs.
Treat these steps as cheap insurance. A few minutes of torque control and fitment checking can save you a full repair or replacement job later.
Frequently Asked Questions About Fairing Mount Tab Cracks
Q: Can a cracked fairing mount tab be repaired permanently?
A: Yes, if the repair is done properly. The key is matching the method to the plastic. ABS and most other thermoplastics take best to plastic welding with a filler rod of the same polymer, followed by a reinforcing layer over the joint. A repair that combines the right heat, the right filler, and a backing reinforcement can restore most of the tab’s original strength and hold up to normal road vibration. Quick fixes built on epoxy alone tend to fail, because cured glue stays brittle and snaps again under load.
Q: How long does a repaired tab last?
A: A well-executed repair on a sound tab can outlast the fairing, often several years or the rest of the bike’s service life. Longevity comes down to three things: the base material, the reinforcement you add, and how you ride. Add a flexible reinforcement layer and keep the bolts correctly torqued, and the fix is durable. A rushed cosmetic patch on a tab that is already fatigued may survive only a few weeks.
Q: Is it safe to ride with a cracked fairing tab?
A: In the short term a single cracked tab is rarely an emergency, but it should never be ignored. A loose fairing can vibrate, rub the frame, and eventually break free, exposing wiring or the radiator and distracting you at speed. If the crack sits at a structural mount near the headlight or radiator, or the panel already feels loose, fix it before your next ride rather than trusting zip ties indefinitely.
Q: Should I repair or replace an aftermarket fairing?
A: It depends on value and condition. Aftermarket panels often use lower-grade plastics, so they crack more easily and may not repair as cleanly as OEM fairings. If the set was inexpensive and only one tab broke, a plastic-weld repair is usually the smart, cost-effective move. Replace the panel when the plastic is brittle throughout or the same crack keeps returning.
Q: How much does fairing replacement cost?
A: Costs vary widely by bike and part. A single OEM side panel runs roughly $80 to $400, while a full aftermarket fairing kit often lands between $300 and $800. Professional plastic-weld repair typically runs $40 to $150 per tab. That gap is why so many riders repair first and replace only when necessary.
| Option | Typical Cost | Best For |
|---|---|---|
| Professional plastic-weld repair | $40 – $150 per tab | One or two clean cracks |
| Single OEM replacement panel | $80 – $400 | Cosmetic damage or brittle OEM part |
| Full aftermarket fairing kit | $300 – $800 | Widespread damage or a full refresh |
Q: What actually causes fairing mount tabs to crack?
A: The usual suspects are vibration, over-tightened bolts, missing or hardened rubber grommets, and minor impacts. These forces concentrate at the thinnest part of the tab, so a small stress point grows into a full crack over time.
Q: How can I stop tabs from cracking again?
A: Reinstall every panel with fresh rubber grommets and shoulder washers, and tighten the bolts to the factory torque spec instead of cranking them down. That lets the fairing flex slightly rather than transferring every jolt into the tab. If you ever need to move a damaged, unrideable bike to a shop, it helps to know typical tow and transport pricing so you can plan the trip. A little preventive care and an honest repair-versus-replace call will keep your fairing mounted, quiet, and secure for years.
Conclusion: From Cracked Tabs to Confident Choices
Fairing mount tab cracks rarely appear overnight. They develop gradually, driven by vibration fatigue, over-tightened fasteners, and the shock of a drop or low-speed tip-over. Understanding why a crack formed is the first step toward a repair that lasts.
Three things to remember:
- Recognize the causes. Vibration, over-torqued bolts, and impact stress are the usual suspects. Fix the root cause, not just the visible crack, or it will return.
- Inspect early. A small, stable crack costs far less to repair than a tab that has already snapped and left your panels rattling against the frame.
- Repair or replace on purpose. Let structural role and cost guide the decision. Tabs that carry real load or anchor several panels usually justify replacement; cosmetic tabs with stable cracks can survive a quality weld. If a bike is too damaged to ride safely, arranging a tow is often the first practical step, and knowing typical tow truck costs and pricing helps you budget for it. Once the bike is loaded and on its way, a friendly gesture never hurts either; our guide to tow truck tipping etiquette explains the unwritten rules.
Summit Fairings: The Right Part, the Right Price, the Right Answer
When replacement is the smarter call, the next problem is finding the correct panel. summitfairings.com carries more than 3,000 styles across nearly every motorcycle model, so you can match make, year, and finish without hunting.
Pricing is the other advantage: Summit Fairings sits 10 to 40 percent below other sites, which keeps a cosmetic setback from turning into a budget crisis. If you are unsure whether a specific panel will fit, or whether a repair is worth attempting, the team guarantees an answer within six hours.
Home mechanic or shop technician, the principle is the same: act early, understand the cause, and choose the fix that matches the tab’s job. Do that, and a cracked mount becomes a maintenance note rather than a mystery.